Introduction
One of the most frustrating experiences in visual design is seeing a graph element on the screen but missing crucial details about it—even though that information exists!
This module will end that frustration by showing you how to create reusable tooltip components. Let’s dive in.
🤔 Tooltip: Why?
The graph below is a scatterplot originally published by Datawrapper. It shows a strong negative correlation between vulnerability to climate change and CO₂ emissions 😔.
The graph looks good, and the message is clear.
But while a few countries are labeled on the chart, isn’t it frustrating not to know which country each data point represents?
In my opinion, it definitely is!
This is where tooltips come into play. Try hovering over a square: an informative tooltip with everything you need to know will appear.
The countries with the highest vulnerability to climate change have the lowest CO2 emissions
All countries sorted by their vulnerability and readiness to climate change. The size shows the CO2 emission per person in that country.
Reproduction of a chart originally published by Data Wrapper using react and d3.js.
Design consideration
A few stuff to keep in mind to create a good tooltip:
⚡️ Fast, but not too fast
Tooltips should appear quickly upon hovering, but not so fast that they flicker with small mouse movements
💧 Show only crucial information
Do not overwhelm the user with a ton of information. Pick only what's truly informative. Tooltip are not always necessary, if it's just to remind the marker value, do not build a tooltip.
📍 Positionning
Tooltips should appear near the cursor without obstructing the view of other data points. They should reposition based on available screen space.
👨🦽 Accessibility
Tooltips should be accessible for all users, including those navigating via keyboard.
👯 Consistency
consistent formatting and style across all tooltips within the chart and within the application. Make tooltip style fits marker style.
Tooltip: How?
The tooltip isn’t built in SVG, but in HTML.
Formatting text in SVG can be cumbersome, and HTML offers useful CSS features like borders and shadows that are perfect for tooltips.
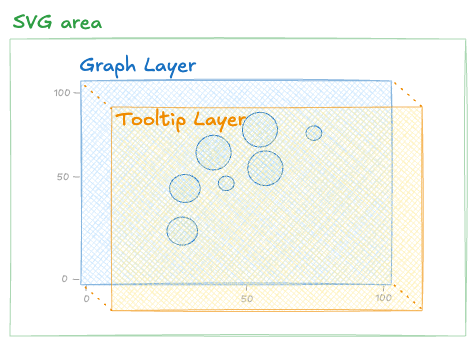
The strategy is straightforward: place a div on top of the SVG area with matching dimensions. This div will host the tooltip React component, rendering HTML directly inside it.

Anatomy of a Graph with an SVG area and an overlaying tooltip layer
Now, we have two tasks ahead:
1️⃣ Create a Tooltip component that displays the information.
2️⃣ Ensure the tooltip appears only when the user hovers over a graph element.
That’s the plan for the next two lessons!